How To Build A Larsen Trap
Firstly you will need to acquire some timber either ready cut or if you are able to cut it yourself, all the better.
Next, you need to cut your timber to size; the main frame is made from 1" x 1¾" So if you have a table saw then you can rip this to size from larger size timber.
Next, you need to cut your timber into the lengths you need. For the frame, you need:
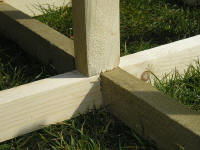
Take 4x lengths at 28" and then half lap them in the middle so they fit together as a cross. All will become apparent.
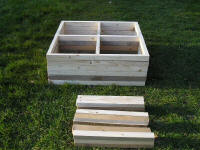
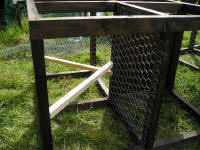
Once this is done, you can begin to fit the pieces together. Joining the half-lapped pieces together and then take 2x 30" lengths and 2x 28" lengths and make a square frame that measures 30x30" Next step is to assemble the crosses into the frames, make sure to centre and square them up before nailing together. You should now be left with (if you are making one Larsen, I am making three) 2x frames and 9x lengths at 18".
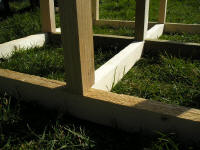
The next step is to fit the two frames together with the pieces of 18" lengths. The corners and middle ones don't really matter which way round they go, but I like to keep mine uniform so that the overall look of the trap is good. I drill a pilot hole through the frame and then use a three-inch screw to fasten the post onto the frame.
The middle post is crucial to its positioning; it determines which two halves of the trap will be.
Once you have your posts fitted to one frame then you can do the exact same and fit the other frame. Once you get to this stage, it is wise to fire a pin into each joint whilst squaring the whole thing up, this will also help to stop the posts from twisting and also keep the frame square.
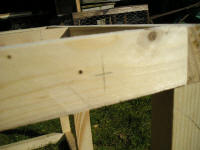
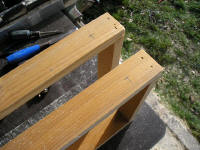
Next job to do is to drill holes for the pivot bar for the trap doors. I position this hole 3, 3/4" from the edge of the frame and centre in the length of timber. There are 4 holes to drill and these holes are the same size as the bar, which is 1/4" or 6mm.
It’s easier to do this now before the wood is treated so that you can see your pencil marks.
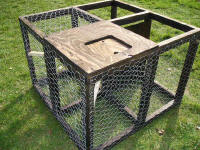
I am using 6mm threaded bar, as this tends to hold in the frame without having to fasten it on. Next, I tend to treat the frame with whatever preservative that I have got spare. Best to use a dark colour so that the trap doesn't stick out like a sore thumb. Whilst your frame is soaking up the treatment, you have time now to get on with the service lid and other things. You will need to acquire some ¼" plywood and cut this into 1x length of 15x15" 1x length of 15x17" 1x length 7x7" and 1x length 15x3"
Take the piece 15x15 and cut a hole 6" square 2" from the edge and centre. (You will see in the photo) A tip is mark the square on the board and then drill out the corners first with a large forstner bit, 30mm should do, then cut in-between the holes to finish off the square. This has the advantage of leaving nice rounded corners. Using sand paper get rid of any rough edges that you might ladder your tights on.
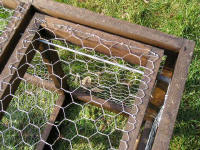
In the 7x7” piece drill a finger hole, again 30mm should do. Next, you need to take 2x lengths of frame timber 1x1¾" and cut them to 13" long. Next is a bit tricky if you don't have a table saw, but can be done with a hammer and chisel if necessary. You need to rabbit out the edges of the timber just over the depth of the plywood and about ½" wide. This is to allow the door to slide once in place. The next step is to assemble these pieces together. So take your 15x15” piece of ply with the hole cut in it, and your sliding lid 7x7” and also the two pieces of rebated wood. You need to fix the pieces of rebated wood to the plywood board as shown in this photo, the sliders are positioned 2" from the edge. (You will see when building how this all fits together) Next job is to fit the piece of ply 15x17” into place as shown in this photo. Next you need to place your wire (you can either use wire netting with a 1" mesh or if you can afford it weld mesh with 1" mesh, I haven’t caught enough moles to be able to afford weld mesh so I am using wire netting) in between the two sections of trap, also now is the time to fit the perches. You don’t need fixed perches, you can use hazel branches poked through the wire netting, but it does make a mess of the wire netting eventually. Note I do not treat the perches with anything (your call bird does not need to be sitting on perches that have been treated with anything that could cause their feet to react badly) Next place your wire over one half of the call bird compartment and then fit the service lid (do not forget to place the sliding door into the runners before you screw the lid down) Now you can go ahead, wire netting up the sides, and bottom. Next, you need to make the trap doors. I make these from slightly thinner wood 2x¾"; this is to make the doors a bit lighter in weight. They measure 12½x11½" overall. Once you have nailed these together you need to then drill holes for the threaded bar to pass through, but these holes will be slightly bigger in diameter than the bar. The holes are placed 2" from the edge. Once you have drilled the holes, treat the wood and fit your wire. Next you need to fit a spring to each door, best way is poke the threaded bar through the hole in the door and then place the spring over the bar and fasten the spring to the door with staples (wire staples) Next, you need to fit the doors in place hammer the bar through the frame and locate the door onto the bar and pass the bar through each hole in turn. Once the door is fitted, you need to staple the other part of the spring onto the frame. Once this is done with both doors, you can then place your piece of plywood 15x3” onto the frame to stop the doors from springing right open. Next get hold of some flexible wire and wire the sliding door to the cage in some fashion, so that it cannot slide open, only you can undo the wire for operation, not the call bird.
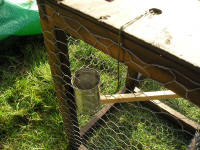
Also I use a washed out dog food tin with a couple of holes knocked through it and wired onto the inside of the call bird section for a drinking solution for the call bird. To set the trap get some dowel cut to length and then in half as shown in the picture. You now have your working Larsen trap. But remember RULES apply when trapping, make sure that your call bird has a fresh supply of water each day and also fresh clean food everyday. REMEMBER TO CHECK YOUR TRAPS EVERYDAY! Good trapping all. If you'd rather buy a Larsen Click here! |